6th String
Tab
E|-----------|
B|-----------|
G|-----------|
D|-----------|
A|-----------|
E|--0--1--3--|
The 6th string is the E string, fret 1 is an F note and 3 is a G note.
Part 1.1:
1. Play the 6th string, E string.
2. Use finger 1 to press down on fret 1 of the E string and play the string.
3. Continue to hold the 1st fret and use finger 3 to press down on fret 3.
finger position like first string
Get this down and that's it! It's time to put this all together: (shown below)
Part 1.2
TAB
|-------------------------------0-1-3--3-1-0------------------------------|
|------------------------0-1-3---------------3-1-0------------------------|
|-------------------0-2-----------------------------2-0-------------------|
|-------------0-2-3-------------------------------------3-2-0-------------|
|-------0-2-3-------------------------------------------------3-2-0-------|
|-0-1-3-------------------------------------------------------------3-1-0-|
Practice 1.2 a lot. Try timing yourself and then beat that time, once you get real good at it, you should be able to play in less than 10 seconds...
5th string
Tab
|-----------|
|-----------|
|-----------|
|-----------|
|--0--2--3--|
|-----------|
The 5th string is the A string, fret 2 is a B note and 3 is a C note.
1. Play the 5th string, A string.
2. Use finger 2 to press down on fret 2 of the A string and play the string.
3. Continue to hold the 2nd fret and use finger 3 to press down on fret 3.
Play this up and down till you got it. Like Part 1, practice going from the D string all the way to the E string shown below)
TAB
|---------------------------0-1-3---3-1-0----------------------------|
|--------------------0-1-3-----------------3-1-0---------------------|
|---------------0-2-------------------------------2-0----------------|
|--------0-2-3-----------------------------------------3-2-0---------|
|-0-2-3-------------------------------------------------------3-2-0--|
|--------------------------------------------------------------------|
4th String
Tab
E|-----------|
B|-----------|
G|-----------|
D|--0--2--3--|
A|-----------|
E|-----------|
The 4th string is the D string, fret 2 is an E note and 3 is an F note.
1. Play the 4th string, D string.
2. Use finger 2 to press down on fret 2 of the D string and play the string.
3. Like we have before, continue to hold the 2nd fret and use finger 3 to press down on fret 3 of the D string and play the string.
Play this up and down till you got it., practice going from the D string all the way to the E string. (shown below)
Tab
E|-----------------0-1-3---3-1-0------------------|
B|-----------0-1-3---------------3-1-0------------|
G|-------0-2---------------------------2-0--------|
D|-0-2-3-----------------------------------3-2-0--|
A|------------------------------------------------|
E|------------------------------------------------|
Guitar String Exercises
The third string, G string (no pun intended), is different than the first two strings, and unlike all the strings this one will only use one note which will be A. Also, we will be using our second finger for the first time.
3rd String
Tab
|--------|
|--------|
|--0--2--|
|--------|
|--------|
|--------|
Part 1.1:
1. Play the 3rd string, G string.
2. Use finger 2 to press down on fret 2 of the G string and play the string.
Remember to use your 2nd finger to play the 2nd fret - very important. Give it some practice then try going from the 3rd string all the to first string and back. (shown below)
Tab
E|-------------0-1-3---3-1-0-------------|
B|------0-1-3-----------------3-1-0------|
G|-0-2-------------------------------2-0-|
D|---------------------------------------|
A|---------------------------------------|
E|---------------------------------------|
2nd String Guitar Exercises
On the guitar the second string is the B string and it uses the same frets as the E string for it's notes. The 1st fret is note C and the 3rd fret is note D. Learning to play on this string will be just like playing on the first string. Once you master the second string you can play a little progression from the 2nd string to the 1st string.
string 2
Tab
E|-----------| 1st String
B|--0--1--3--| 2nd String
G|-----------| 3rd String
D|-----------| 4th String
A|-----------| 5th String
E|-----------| 6th String
This should look familiar, this time were playing the 2nd string on the guitar. For some people, playing a string that's in between strings can be a little tricky at first...
1. Play the 2nd string, B string.
2. Use finger 1 to press down on fret 1 of the B string and play the string.
3. Like last time, continue to hold down the 1st fret and use the 3rd finger to play the 3rd fret.
If you have a tough time, keep practicing. Also, try to get where you can play it without looking at the guitar.
2nd String
Tab
E|------------------|
B|--0--1--3--1--0---|
G|------------------|
D|------------------|
A|------------------|
E|------------------|
1. Play the 2nd string, B string.
2. Use finger 1 to press down on fret 1 of the B string and play the string.
3. Continue to hold down the 1st fret and use the 3rd finger to play the 3rd fret.
4. Release the 3rd finger and play the first fret.
5. Play an open B string.
Notes:
Get good at this and the next part we'll transition from one string to the other.
Practice
Tab
E|------------0--1--3---|
B|--0--1--3-------------|
G|----------------------|
D|----------------------|
A|----------------------|
E|----------------------|
On the tab above we are going to start on the 2nd string (left side) and move down to the first string (right side).
1. Play the open B string, then 1st fret followed by the 3rd. 2. Without delay play an open E string.
3. Finish with the rest by playing the 1st fret followed by the the 3rd.
Notes:
As always, practice, play it till you got it. Once you got it down, play it backwards.
exe
Tab
E|------------0--1--3---3--1--0--------------|
B|--0--1--3-----------------------3--1--0----|
G|-------------------------------------------|
A|-------------------------------------------|
D|-------------------------------------------|
E|-------------------------------------------|
Now we will put it all together. The tab above will play B, C, D, E, F, G and back down. You delay between the 2nd and 3rd riffs (the two G notes) but try to play with out delay when transitioning from one string to another.
Additional Guitar Exercises
|-----------------0-0--1-1--3-3---3-3--1-1--0-0-----------------|
|-0-0--1-1--3-3-----------------------------------3-3--1-1--0-0-|
|------------------------------------------------------------------------|
|------------------------------------------------------------------------|
|------------------------------------------------------------------------|
|------------------------------------------------------------------------|
|-3-----1---3----|
|----3-------------|
|-------------------|
|-------------------|
|-------------------|
|-------------------|
The above exercise might be a little tricky, but it's a good one to get good at. Start with the 3rd fret of the E string then play the third fret of the B string and so forth. We'll see more of these in later lessons.
For beginners the following might take some time to get through. Play each part in the lesson till you've got it down. Try playing without having to look at the hand that's pressing down the frets of the guitar. Be patient, practice and take your time to work through this lesson.
Guitar basic notes
Tab
E|--0--1--3--| 1st String
B|--0--1--3--| 2nd String
G|---0----2--| 3rd String
D|--0--2--3--| 4th String
A|--0--2--3--| 5th String
E|--0--1---3--| 6th srring
1st string 0= open string "E" 1= first fret, pressing with index finger that’s "F", 3= third fret pressing with ring finger that’s "G"
2nd string 0= open string "B" 1= first fret, pressing with index finger that’s "C", 3= third fret pressing with ring finger that’s "D"
3rd string 0= open string "G" 2= second fret with middle finger that’s "A"
4th string 0= open string "D" 2= second fret with middle finger that "E", 3= third fret with ring finger that’s "F"
5th string 0= open string "A" 2=second fret with middle finger that’s "B" , 3= third fret with ring finger that’s "C"
6th String 0= open string "E" 1= first fret, pressing with index finger that’s "F", 3= third fret pressing with ring finger that’s "G"
1. Pluck the bottom E string.
2. Use finger 1 to press down on fret 1 of the bottom string and pluck the string.
3. Continue to press down on fret 1 with finger 1 and use finger 3 to press down on fret 3 of the bottom string and pluck the string.
This can be tricky for someone just getting started. Practice this till you can do it easily. Remember keep that 1st finger on fret 1.
Practice
Tab
E|--3--1--0--| 1st String
B|-----------| 2nd String
G|-----------| 3rd String
D|-----------| 4th String
A|-----------| 5th String
E|-----------| 6th String
Play it back down. Note: when you play this you will once again have fret 1 pressed down.
1. Place your fingers on the frets, finger 1 on fret 1 and finger 3 on fret 3.
2. Play (pluck) the 3rd fret of the bottom string
3. Release your third finger off the string and play the 1st fret with finger one which should already be pressing down the fret.
4. Release finger one and play the bottom string.
Practice this till you can do it easily. Remember keep that 1st finger on fret 1 when playing fret 3.
Open Strings
Tab
E|--0--------| 1st String
B|--0------| 2nd String
G|--0------| 3rd String
D|--0------| 4th String
A|--0------| 5th String
E|--0------| 6th String
How to read Guitar Tablature (Tab)
Guitar tablature is a unique and simple way of learning how to play the guitar, a song, or riff. Tablature is set up to tell you what fret to play on what strings to play. The top line of tablature is the first string (bottom E string). The next line from the top is your second string (B) and it goes on so forth till you reach the bottom line which is your sixth string (top E string). Brief example:
E|---1---| 1st String
B|-------| 2nd String
G|-------| 3rd String
D|-------| 4th String
A|-------| 5th String
E|-------| 6th String

The example above tells you to play the 1st fret on the first string (bottom string). Do this by placing your index finger (finger 1) just before the first fret on the first string and pluck the string. The black dot on the diagram above will show you where to place your finger.
Tab goes into more detail and has ways of showing hammers, slides, etc. As you progress through the lessons you will start to see more explanations on tablature.
Guitar Finger Exercises
If you are an absolute beginner you should start here. Here will start with some simple tablature and play on one string. Once you get that down we will move onto to the other strings. This an easy foundation to get your fingers used to playing the guitar. It takes a while to get used to using different fingers to play different notes. Learning to pick through notes is also an absolute base to getting your fingers ready to play solo's. (If you're just starting, don't get to excited yet!)
Open Strings
Tab
E|--0--------| 1st String
B|--0------| 2nd String
G|--0------| 3rd String
D|--0------| 4th String
A|--0------| 5th String
E|--0------| 6th String
How to play
1. Pluck the bottom E string.
2. Use finger 1 to press down on fret 1 of the bottom string and pluck the string.
Try playing the open string for about a second then the 1st fret for about a second (One.....Two....).
Reading guitar tablature.

The diagram to your right is rather simple. Throughout the lessons, especially the chord charts you will see references to the numbers located above each finger. Therefore, when you see "place your second and third fingers at..." you'll know what I'm talking about. If your left handed it's all the same with your right hand.
JAI HO - SLUM DOG
GUITAR CODES WITH LERYCS
(Am)Aaja aaja jind shamiyane ke tale
Aaja (Dm)jariwale nile aas(F)man ke (G)tale
(F)Jai (Am)ho
(F)Jai (Am)ho
Jai (C)ho
Jai (G)ho
Jai (Am7)ho
Jai (G)ho
(C)Ratti ratti sachi maine jaan gavayi hai
(Gm)Nach nach koylo pe raat bitayi hai
(C)Akhiyon ki neend maine phoonko se uda di
(Gm)Neele tare se maine ungli jalayi hai
(Am)Aaja aaja jind shamiyane ke tale
Aaja (Dm)jariwale nile aas(F)man ke (G)tale
(F)Jai (Am)ho
(F)Jai (Am)ho
Jai (C)ho
Jai (G)ho
Jai (Am7)ho
Jai (G)ho
(C)kab se ha kab se tu (Am)lab pe ruki (F)hai
(C)kah de
(C)kah de ha kah de ab (Am)aankh jhuki (F)hai
(C)kah de
(C)Aisi aisi (F)roshan aankhe (C)roshan dono
(Am)bhi hai (C)hai kya
(Am)Aaja aaja jind shamiyane ke tale
Aaja (Dm)jariwale nile aas(F)man ke (G)tale
(F)Jai (Am)ho
(F)Jai (Am)ho
Jai (C)ho
Jai (G)ho
Jai (Am7)ho
Jai (G)ho
Summary: The key signature at the beginning of a musical staff lists the sharps or flats in the key.
The key signature comes right after the clef symbol on the staff. It may have either some sharp symbols on particular lines or spaces, or some flat symbols, again on particular lines or spaces. If there are no flats or sharps listed after the clef symbol, then the key signature is "all notes are natural".
In common notation, clef and key signature are the only symbols that normally appear on every staff. They appear so often because they are such important symbols; they tell you what note is on each line and space of the staff. The clef tells you the letter name of the note (A, B, C, etc.), and the key tells you whether the note is sharp, flat or natural.
Scales
A scale is a group of pitches (scale degrees) arranged in ascending order. These pitches span an octave. Diatonic scales are scales that include half and whole steps. The first and last note is the tonic. It is the most 'stable' note, or rather the easiest to find. Because of this, diatonic melodies often end on the diatonic note. The other notes in the scale also have names. The second note is the supertonic. The third is the mediant, halfway between the tonic and dominant. The fourth note is the subdominant. The fifth note is the dominant. The submediant is the sixth note. The subtonic is the seventh note in the natural minor scale. The seventh tone of the major, harmonic and melodic minor scales is called the leading tone if it is one half step lower than the tonic.
The Major ScaleThe major scale consists of seven different pitches. There are half steps between the third and fourth and seventh and eighth scale degrees; whole steps exist between all other steps. Below is a the C major scale. The pattern of whole and half steps is the same for all major scales. By changing the first note, then using the pattern as a guide, you can construct any major scale. Likewise, if you know the pattern for any other scale, you can create them, too.

The Natural Minor Scales
These scales have seven different scale degrees. There are half steps between the second and third and the fifth and sixth degrees; whole steps exist between all other steps. Shown below is the A minor scale.

The Harmonic Minor Scale
This scale is the same as the natural minor scale, except the seventh step is raised a half step. There is now an interval of one half step between the seventh and eighth notes, and one and a half steps between the sixth and seventh notes. This is a harmonic A minor.

The Melodic Minor ScaleThis is another minor scale variation. In this scale, the sixth and seventh notes are each raised one half step. All the patterns to this point have been the same as one climbs and descends the scales. The melodic minor scale, however, ascends with the modifications noted above, but descends in the natural minor scale. This is a melodic A minor.
Pentatonic Scales
Pentatonic scales, as their name suggests, have only five notes. To get from one end of the scale to the other, they require gaps of more than a half step.
Scales that do not follow the interval patterns of the diatonic or pentatonic scales are called nondiatonic scales. Many nondiatonic scales have no identifiable tonic.
The chromatic scale is a nondiatonic scale that consists of half steps only. Because each pitch is equidistant, there is no tonic. A whole tone scale is comprised of whole steps. Like the chromatic scale, it too has no tonic. The blues scale is a chromatic variant of the major scale. This scale contains flat thirds and sevenths which alternate with normal thirds and sevenths. This alternating creates the blues inflection.
TranspositionScale patterns can be duplicated at any pitch. Rewriting the same scale pattern at a different pitch is called transposition. Thus, if you used the major scale pattern, but started at G, you would just have to count up according to the major scale pattern to transpose it. All the notes of a piece can be modified in this way, by finding a note's counterpart in the modified scale.
Since some notes will always be sharp once transposed or in certain scales, it is sometimes helpful to place accidentals at the very beginning of a piece in order to modify all the notes of a certain pitch. Placing accidentals at the beginning of the music (as opposed to right beside a note) allows the accidentals to affect every note in the entire piece. So, placing a sharp on line F makes every F sharp. The arrangement of sharps and flats at the beginning of a piece of music is called a key signature.
Key SignaturesTo help understand and remember key signatures, a chart called the circle of fifths can be used. On the outside are the major key names, separated by fifths. On the inside are the corresponding minor key names. In the middle is the number and position of the sharps or flats.

There is a little trick to figuring out a key signature's name. When confronted with a key signature that consists of flats, look at the flat second from the far right. This flat is on the line or space the key signature is named after. One flat is F, since you can't go to the next -to-last flat. To find the name of a key signature with sharps, look at the sharp farthest to the right. The key signature is the note a half step above that last sharp.
Key signatures can specify major or minor keys. To determine the name of a minor key, find the name of the key in major and then count backwards three half steps. Remember that sharps and flats affect names.
Modes
In the middle ages, modes were used to organize the melodic and harmonic parts of music. From the 17th century until the 19th century, modes were not used as widely. Modes in this time were replaced by the major and minor scales. Modes, however, are still heard in contemporary music. Modes, created mainly by the churches, were the basis for most of western music. Curiously, in modes, the beginning tone is called the final, as opposed to the tonic as in other diatonic scales.
Table of Modes Name Range Final Half Steps Are Between Similar Scale
Dorian D to D D 2-3, 6-7 Natural minor scale with raised sixth degree
Phrygian E to E E 1-2, 5-6 Natural minor scale with lowered second degree
Lydian F to F F 4-5, 7-8 Major scale with raised fourth degree
Mixolydian G to G G 3-4, 6-7 Major scale with lowered seventh degree
Aeolian A to A A 2-3, 5-6 Same as natural minor scale
Ionian C to C C 3-4, 7-8 Same as major scale
Locrian B to B B 1-2, 4-5 Natural minor with a lowered second and fifth degree.
Modes may begin on any tone as long as the arrangements of half and whole steps remain the same. The identity of a transposed mode can be quickly determined since the final of each mode lies in the same relationship to the tonic of the major with the same key signature.
1.The final of the Dorian mode is always the second degree of the major scale.
2.The final of the Phrygian mode is always the third degree of a major scale.
3.The final of the Lydian mode is always the fourth degree of a major scale.
4.The final of the Mixolydian mode is always the fifth degree of a major scale.
5.The final of the Aeolian mode is always the sixth degree of a major scale.
6.The final of the Ionian mode is always the first degree of a major scale.
7.Locrian modes are rarely used.
Solfeggio
Often, solfeggio is used to help with practicing. The solfeggio syllables are associated with the notes in a given scale. The syllable Do (pronounced dough, or doe), corresponds to the tonic. The next syllable (in ascending order) is Re (say 'ray'). Re corresponds to the supertonic. Mi (say 'me') is the next syllable. Mi corresponds to the mediant. Fa (long a) comes next, corresponding to the subdominant. Sol (say 'so') is the syllable that corresponds to the dominant. La (long a) is the syllable that corresponds to the submediant. Ti (say 'tea') corresponds to the leading tone.

This table shows the solfeggio syllables and corresponding hand signs in descending order.
Do - a fist that is held straight.
Ti is index finger pointing up and the thumb and middle ring finger and pinkie are all touching (the same as for sign language T).
La is all four fingers and thumb facing the ground and the wrist is bent down as well.
Sol is the thumb facing the ceiling the rest of the hand is out straight.
Fa is a thumbs down.
Mi is the hand held flat.
Re is a flat hand help up straight out and then raised to about a 30 degree angle. Both Mi and Re have palm side down.
Do is the fist sign again.
The table above shows the hand signs that correspond to the solfeggio syllables. The hand signs start with the lower tonic at about waist level. Each successive hand sign is a little higher than the last. The second tonic ends a little above eye level.
Solfeggio is a good practice tool. Since it is fairly generic, it can be used with a variety of scales. Pentatonic scales consists of five tones, and therefore Fa and Ti aren't used.
There are also solfeggio accidentals. These accidentals are shown and listed in the chart below.

Summary: The time signature on a musical staff tells you the meter of the music by defining both the number of beats in a measure and the type of note that fills one beat.
The time signature appears at the beginning of a piece of music, right after the key signature. Unlike the key signature, which is on every staff, the time signature will not appear again in the music unless the meter changes. The meter of a piece of music is its basic rhythm; the time signature is the symbol that tells you the meter of the piece and how (with what type of note) it is written

Figure 1: The time signature appears at the beginning of the piece of music, right after the clef symbol and key signature.
Beats and Measures
Because music is heard over a period of time, one of the main ways music is organized is by dividing that time up into short periods called beats. In most music, things tend to happen right at the beginning of each beat. This makes the beat easy to hear and feel. When you clap your hands, tap your toes, or dance, you are "moving to the beat". Your claps are sounding at the beginning of the beat, too. This is also called being "on the downbeat", because it is the time when the conductor's baton hits the bottom of its path and starts moving up again.
Example 1
Listen to excerpts A, B, C and D. Can you clap your hands, tap your feet, or otherwise move "to the beat"? Can you feel the 1-2-1-2 or 1-2-3-1-2-3 of the meter? Is there a piece in which it is easier or harder to feel the beat?
A
B
C
D
The downbeat is the strongest part of the beat, but some downbeats are stronger than others. Usually a pattern can be heard in the beats: strong-weak-weak-strong-weak-weak, or strong-weak-strong-weak. So beats are organized even further by grouping them into bars, or measures. (The two words mean the same thing.) For example, for music with a beat pattern of strong-weak-weak-strong-weak-weak, or 1-2-3-1-2-3, a measure would have three beats in it. The time signature tells you two things: how many beats there are in each measure, and what type of note gets a beat.
Figure 2: This time signature means that there are three quarter notes (or any combination of notes that equals three quarter notes) in every measure. A piece with this time signature would be "in three four time" or just "in three four".
Reading the Time Signature
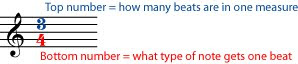
Figure 2: This time signature means that there are three quarter notes (or any combination of notes that equals three quarter notes) in every measure. A piece with this time signature would be "in three four time" or just "in three four". Reading the Time Signature
Exercise 1
Listen again to the music in Example 1. Instead of clapping, count each beat. Decide whether the music has 2, 3, or 4 beats per measure. In other words, does it feel more natural to count 1-2-1-2, 1-2-3-1-2-3, or 1-2-3-4-1-2-3-4?
Solution
A has a very strong, quick 1-2-3 beat.
B is in a slow (easy) 2. You may feel it in a fast 4.
C is in a stately 4.
D is in 3, but the beat may be harder to feel than in A because the rhythms are more complex and the performer is taking some liberties with the tempo.
Meter: Reading Time Signatures
Most time signatures contain two numbers. The top number tells you how many beats there are in a measure. The bottom number tells you what kind of note gets a beat.

Figure 3: In "four four" time, there are four beats in a measure and a quarter note gets a beat. Any combination of notes that equals four quarters can be used to fill up a measure.
You may have noticed that the time signature looks a little like a fraction in arithmetic. Filling up measures feels a little like finding equivalent fractions, too. In "four four time", for example, there are four beats in a measure and a quarter note gets one beat. So four quarter notes would fill up one measure. But so would any other combination of notes that equals four quarters: one whole, two halves, one half plus two quarters, and so on.
Example 2
If the time signature is three eight, any combination of notes that adds up to three eighths will fill a measure. Remember that a dot is worth an extra half of the note it follows. Listen to the rhythms in Figure 4.

Figure 4: If the time signature is three eight, a measure may be filled with any combination of notes and rests that adds up to three eight.
Exercise 2
Write each of the time signatures below (with a clef symbol) at the beginning of a staff. Write at least four measures of music in each time signature. Fill each measure with a different combination of note lengths. Use at least one dotted note on each staff. If you need some staff paper, you can download this PDF file.
Two four time
Three eight time
Six four time
Solution
There are an enormous number of possible note combinations for any time signature. That's one of the things that makes music interesting. Here are some possibilities. If you are not sure that yours are correct, check with your music instructor.
Figure 5: These are only a few of the many, many possible note combinations that could be used in these time signatures.
A few time signatures don't have to be written as numbers. Four four time is used so much that it is often called common time, written as a bold "C". When both fours are "cut" in half to twos, you have cut time, written as a "C" cut by a vertical slash.

Figure 6
Counting and Conducting
You may have already noticed that a measure in four four time looks the same as a measure in two two. After all, in arithmetic, four quarters adds up to the same thing as two halves. For that matter, why not call the time signature "one one" or "eight eight"?
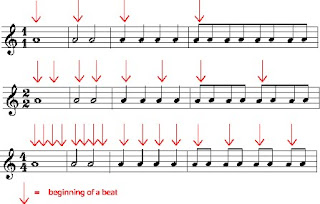
Figure 7: Measures in all of these meters look the same, but feel different. The difference is how many downbeats there are in a measure.
Or why not write two two as two four, giving quarter notes the beat instead of half notes? The music would look very different, but it would sound the same, as long as you made the beats the same speed. The music in each of the staves in Figure 8 would sound like this.

Figure 8: The music in each of these staves should sound exactly alike.
So why is one time signature chosen rather than another? The composer will normally choose a time signature that makes the music easy to read and also easy to count and conduct. Does the music feel like it has four beats in every measure, or does it go by so quickly that you only have time to tap your foot twice in a measure?
A common exception to this is six eight time, and the other time signatures (for example nine eight and twelve eight) commonly used to write compound meters. A piece in six eight might have six beats in every measure, with an eighth note getting a beat. But it is more likely that the conductor will give only two beats per measure, with a dotted quarter (or three eighth notes) getting one beat. Since beats normally get divided into halves and quarters, this is the easiest way for composers to write beats that are divided into thirds. In the same way, three eight may only have one beat per measure; nine eight, three beats per measure; and twelve eight, four beats per measure.

Figure 9:
In six eight time, a dotted quarter usually gets one beat. This is the easiest way to write beats that are evenly divided into three rather than two.
NENJUKKUL PAIDHIDUM- VAARANAM AAYIRAM
GUIAR CODES WITH LERYCS
A
nenjukkul peidhidum maamazhai
F#m E
neerukkul moozhkidum thaamarai
C#m D
sattendru maaruthu vaanilai
E
penne un mael pizhai
A
nillaamal veesidum paer alai
F#m E
nenjukkul neendhidum kaadhalai
C#m D
ponvannam soodidum kaarigai
E
penne un kaanjalai
Bm A E
om shanthi shanthi om shanthi
Bm A E
en uyirai uyirai nee aenthi
Bm A E
aen sentraai sentraai enai thaandi
Bm A E
ini nee thaan enthan andhaadhi
A
nenjukkul peidhidum maamazhai
F#m E
neerukkul moozhkidum thaamarai
C#m D
sattendru maaruthu vaanilai
E
penne un mael pizhai
A D E
aetho ontru ennai eerkka
F#m D E
mookkin nuni marmam saerkka
A D E
kallaththanam aethum illaa
F#m D E
punnnagayo pogum illaa
A E
nee nintra idam entraal vilai aeri pogaatho
A E
nee sellum idam ellaam panikatti aagatho
Bm D E
ennodu vaa veedu varaikkum
Bm D
en veettai paar ennai pidikkum
Bm A E
ival yaaro yaaro theriyaathe
Bm A E
ival pinnaal nenje pogaathe
Bm A E
ithu poiyo meiyo theriyaathe
Bm A E
ival pinnaal nenje pogaathe


.gif)
.gif)
.gif)
.gif)
.gif)
.gif)
.gif)
.gif)
.gif)
.gif)


 <
<